[강의요약] 스프링부트 개념과 활용 - 스프링 데이터 (1/3)
개인적인 학습을 위한 Inflearn - 스프링부트 개념과 활용(백기선) 강의 요약입니다.
개념과 원리 위주로 요약합니다.
이전 글 에서 이어집니다.
4부. 스프링 부트 활용 - 스프링 데이터
1. 스프링 데이터 소개
1-1. SQL DB : 스프링 JDBC
1-2. SQL DB : 스프링 데이터 JPA
1-3. No SQL : 스프링 데이터. Redis, MongoDB, Neo4J
2. 인메모리 데이터베이스
프로젝트 생성 : springbootjdbc (web, jdbc, h2 의존성)
2-1. jdbc 의존성
spring-boot-starter-jdbc
- HikariCP
- spring-jdbc
2-2. 자동설정
아무것도 설정하지 않으면 인메모리 데이터베이스로 동작
DataSource와 JdbcTemplate 주입
// spring-boot-autoconfigure > spring.fatories
org.springframework.boot.autoconfigure.jdbc.DataSourceAutoConfiguration,\
org.springframework.boot.autoconfigure.jdbc.JdbcTemplateAutoConfiguration,\
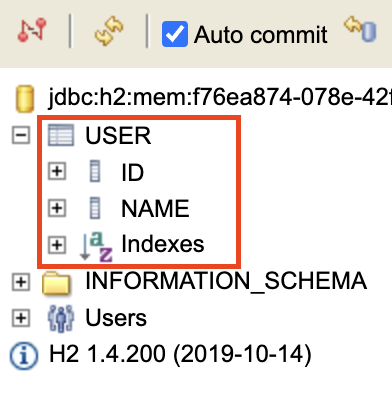
2-3. H2로 인메모리 DB에 테이블 생성
지원 인메모리 DB : H2(default), HSQL, Derby
인메모리 DB default 설정은 DataSourceProperties.java
@Component
public class H2Runner implements ApplicationRunner {
    @Autowired
    DataSource dataSource;

    @Override
    public void run(ApplicationArguments args) throws Exception {
        try(Connection connection = dataSource.getConnection()) { // java 8 기능
            System.out.println(connection.getMetaData().getURL());
            System.out.println(connection.getMetaData().getUserName());

            Statement statement = connection.createStatement();
            String sql = "CREATE TABLE USER(ID INTEGER NOT NULL, NAME VARCHAR(255), PRIMARY KEY (ID))";
            statement.executeUpdate(sql);
        }
    }
}
코드를 작성해도 콘솔에서 확인이 불가. h2 콘솔을 이용하자
2-4. H2 콘솔 사용하기
2-4-1. 설정 방법
application.properties 에 spring.h2.console.enabled=true 또는 spring-boot-devtools 의존성 추가
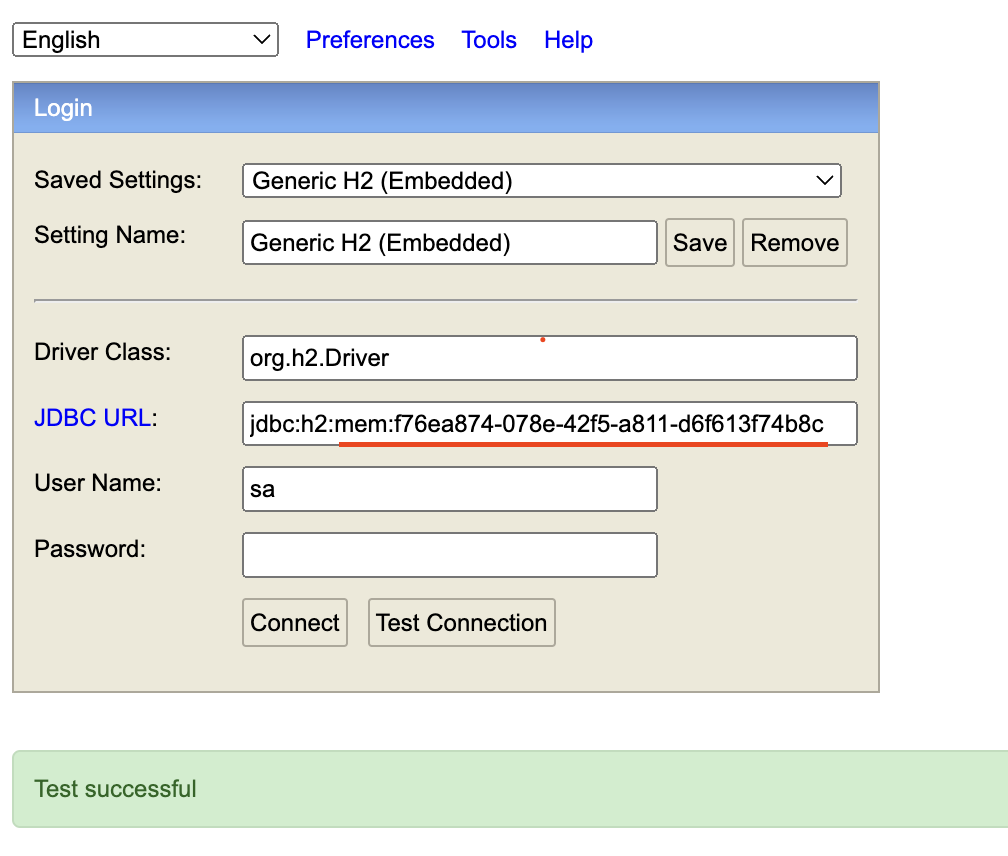
2-4-2. 콘솔 로그인
프로그램 실행할 때 출력한 getURL 정보를 콘솔에 입력


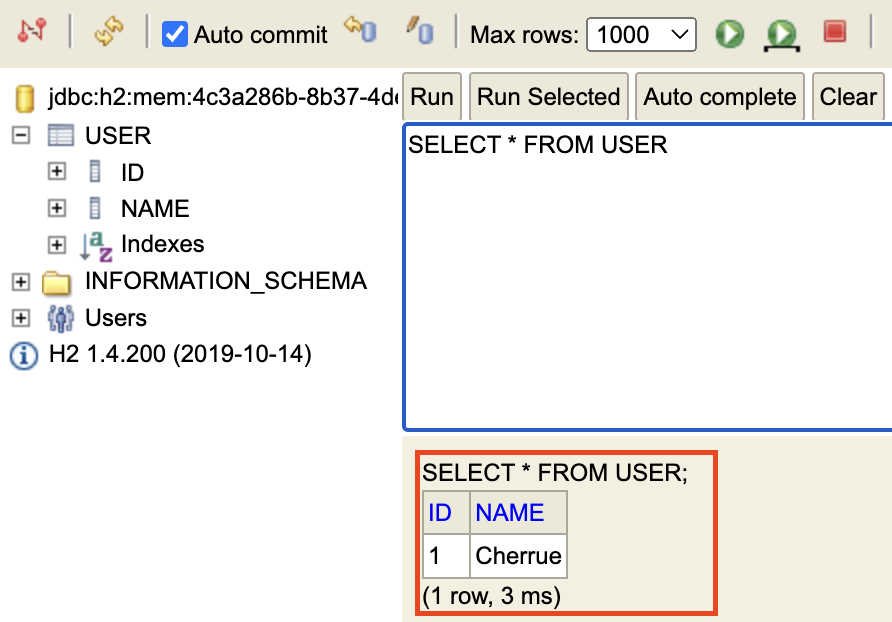
결과

2-5. JdbcTemplate 으로 데이터 삽입하기
JdbcTemplate 장점
- 소스 간결
- 리소스 반납 처리를 스프링에서 해줌
- 에러 메세지를 보기 좋게 출력
@Component
public class H2Runner implements ApplicationRunner {
    @Autowired
    DataSource dataSource;

    @Autowired
    JdbcTemplate jdbcTemplate;

    @Override
    public void run(ApplicationArguments args) throws Exception {
        try(Connection connection = dataSource.getConnection()) { // java 8 기능
            System.out.println(connection.getMetaData().getURL());
            System.out.println(connection.getMetaData().getUserName());

            Statement statement = connection.createStatement();
            String sql = "CREATE TABLE USER(ID INTEGER NOT NULL, NAME VARCHAR(255), PRIMARY KEY (ID))";
            statement.executeUpdate(sql);
        }

        jdbcTemplate.execute("INSERT INTO USER VALUES (1, 'Cherrue')"); // 데이터 삽입
    }
}

3. MySQL 설정하기
지원 DBCP : HikariCP(default), Tomcat CP, Commons DBCP2
DBCP : DataBase Connection Pool. Connection 맺고 끊는 과정이 오버헤드가 커서 미리 만들어 놓고 끌어쓰는 방식
3-1. Hikari의 각종 설정
- autoCommit : 자동 커밋 (default true)
- connectionTimeout : 쿼리에 대한 최대 응답 대기 시간. (default 30s)
- maximumPoolSize : 최대 커넥션 개수. (default 10)
커넥션이 많다고 모두 일을 하는 것이 아님. CPU 개수 만큼만 동시에 동작이 가능
3-2. HikariCP 설정
application.properties에서 설정하기 (기본값 : HikariConfig.java)
// application.properties
spring.datasource.hikari.maximum-pool-size=4
3-3. MySql 사용하기
3-3-1. 의존성 추가
<!-- pom.xml -->
<!-- MySql connector 추가 -->
<dependency>
	<groupId>mysql</groupId>
	<artifactId>mysql-connector-java</artifactId>
</dependency>
3-3-2. mysql 설치 (docker 사용)
cask는 어플리케이션도 같이 설치할 때 사용하는 것인데, 난 docker desktop 앱도 쓸 생각이라 옵션을 줬다
# brew 설치
$ /bin/bash -c "$(curl -fsSL https://raw.githubusercontent.com/Homebrew/install/HEAD/install.sh)"

# docker 설치. 5분 가량 소요
$ brew install --cask docker

# app 서랍에 docker 실행 > 비밀번호 입력 > 라이센스 동의 > docker 실행 대기

# Mysql 실행
$ docker run -p 3306:3306 --name mysql_boot -e MYSQL_ROOT_PASSWORD=1 -e MYSQL_DATABASE=springboot -e MYSQL_USER=cherrue -e MYSQL_PASSWORD=pass -d mysql

# docker 컨테이너에 뜬 MySQL 접속
$ docker exec -i -t mysql_boot bash    23:41:14
root@db9aae6e2bff:/# mysql -u cherrue -p
Enter password:
Welcome to the MySQL monitor.  Commands end with ; or \g.
Your MySQL connection id is 9
Server version: 8.0.28 MySQL Community Server - GPL

Copyright (c) 2000, 2022, Oracle and/or its affiliates.

Oracle is a registered trademark of Oracle Corporation and/or its
affiliates. Other names may be trademarks of their respective
owners.

Type 'help;' or '\h' for help. Type '\c' to clear the current input statement.

mysql> use springboot;
Database changed
mysql> show tables;
Empty set (0.00 sec)
3-3-3. mysql 커넥션 설정
spring.datasource.hikari.maximum-pool-size=4

spring.datasource.url=jdbc:mysql://localhost:3306/springboot
spring.datasource.username=cherrue
spring.datasource.password=pass
📌 오류 대응
datasource에 Localhost를 주니 Access denied for user ‘cherrue’@’localhost’가 발생한다.
java.sql.SQLException: Access denied for user 'cherrue'@'localhost' (using password: YES)
계정 정보를 확인하니 cherrue@localhost 가 없다.
$ docker exec -i -t mysql_boot bash
root@db9aae6e2bff:/# mysql -u root -p
mysql> select host, user from mysql.user;
+-----------+------------------+
| host      | user             |
+-----------+------------------+
| %         | cherrue          |
| %         | root             |
| localhost | mysql.infoschema |
| localhost | mysql.session    |
| localhost | mysql.sys        |
| localhost | root             |
+-----------+------------------+
6 rows in set (0.00 sec)
cherrue@localhost를 추가하거나, localhost가 아니라 외부에서 접근하는 것처럼 설정하면 된다.
난 귀찮아서 내부 ip를 적어주었다.
# application.properties
spring.datasource.url=jdbc:mysql://{ 내부 IP }:3306/springboot
spring.datasource.username=cherrue
spring.datasource.password=pass
결과
2022-02-22 00:02:57.514  INFO 33046 --- [           main] m.c.demo.SpringbootjdbcApplication       : Started SpringbootjdbcApplication in 1.544 seconds (JVM running for 1.877)
2022-02-22 00:02:57.516  INFO 33046 --- [           main] com.zaxxer.hikari.HikariDataSource       : HikariPool-1 - Starting...
2022-02-22 00:02:57.823  INFO 33046 --- [           main] com.zaxxer.hikari.HikariDataSource       : HikariPool-1 - Start completed.
class com.zaxxer.hikari.HikariDataSource
jdbc:mysql://{ 내부 IP }:3306/springboot
cherrue@{ 외부 IP }
❗ MySQL은 상용으로 쓰면 라이센스 비용 + GPL이라 소스 공개 필요. 무료가 필요하면 MariaDB 사용.
명령어와 소스코드를 똑같이 써도 동작한다.
mariadb 는 GPL2라서 소스코드 공개는 발생할 수 있음. 비용만 무료!
$ docker run -p 3306:3306 --name mysql_boot -e MYSQL_ROOT_PASSWORD=1 -e MYSQL_DATABASE=springboot -e MYSQL_USER=cherrue -e MYSQL_PASSWORD=pass -d mariadb
4. PostgresSQL
4-1. 의존성 추가
database가 여러 개가 추가가 되어있어도, application.properties에서 설정한 드라이버만 사용됨
<!-- pom.xml -->
<dependency>
	<groupId>org.postgresql</groupId>
	<artifactId>postgresql</artifactId>
</dependency>
4-2. postgresql 설치 (docker 사용)
최신본을 사용하면 ssl 설정과 계정 설정 때문에 안 된다. 9.6.2를 사용하자
# postgres 설치
$ docker run -p 5432:5432 -e POSTGRES_PASSWORD=pass -e POSTGRES_USER=cherrue -e POSTGRES_DB=springboot --name postgres_boot -d postgres:9.6.2

# bash로 이동
$ docker exec -i -t postgres_boot bash

$ su - postgres

$ psql -u cherrue springboot

데이터베이스 조회
\list

테이블 조회
\dt

쿼리
SELECT * FROM account;
4-3. application.properties 작성
spring.datasource.url=jdbc:postgresql://localhost:5432/springboot
spring.datasource.username=cherrue
spring.datasource.password=pass
4-4. ApplicationRunner 작성
@Component
public class PgSQLRunner implements ApplicationRunner {
    @Autowired
    DataSource dataSource;

    @Autowired
    JdbcTemplate jdbcTemplate;

    @Override
    public void run(ApplicationArguments args) throws Exception {
        try(Connection connection = dataSource.getConnection()) { // java 8 기능
            System.out.println(dataSource.getClass());
            System.out.println(connection.getMetaData().getDriverName());
            System.out.println(connection.getMetaData().getURL());
            System.out.println(connection.getMetaData().getUserName());

            Statement statement = connection.createStatement();
            String sql = "CREATE TABLE ACCOUNT(ID INTEGER NOT NULL, NAME VARCHAR(255), PRIMARY KEY (ID))";
            statement.executeUpdate(sql);
        }

        jdbcTemplate.execute("INSERT INTO ACCOUNT VALUES (1, 'Cherrue')");
    }
}
결과
// console log
2022-02-22 00:37:34.654  INFO 33943 --- [           main] com.zaxxer.hikari.HikariDataSource       : HikariPool-1 - Starting...
2022-02-22 00:37:34.727  INFO 33943 --- [           main] com.zaxxer.hikari.HikariDataSource       : HikariPool-1 - Start completed.
class com.zaxxer.hikari.HikariDataSource
PostgreSQL JDBC Driver
jdbc:postgresql://localhost:5432/springboot
cherrue
// psql cli
springboot=# SELECT * FROM ACCOUNT;
 id |  name
----+---------
  1 | Cherrue

댓글남기기