[Springboot] OAuth2 와 JWT (2) SNS 연동 구현
이전 글 - 이론 편 에서 이어집니다.
구현
springboot를 이용해 OAuth2.0 과 JWT를 이용해 로그인을 구현합니다.
클라이언트는 별도 구성 없이 springboot에서 thymeleaf를 이용해 구현합니다
환경
| 환경 | 버전 |
|---|---|
| java | 11 |
| springboot | 2.7.0 |
| gradle | 7.4.1 |
Step 1. SNS 연동 (OAuth 2.0 설정)
이번 스텝에서는 Spring tutorials 내용을 구현합니다.
이 글에서 파란 글씨의 테스트는 쿠키 초기화를 위해 매번 새 시크릿 창을 열어 테스트합니다.
OAuth Spring tutorials : https://spring.io/guides/tutorials/spring-boot-oauth2/
1. 기본 화면 구성
프로젝트 생성
springboot 프로젝트 생성 : spring-boot-starter-web, jquery, bootstrap, webjars-locator-core 추가
기타 lombok, test 등 util 추가
- build.gradle
plugins {
    id 'org.springframework.boot' version '2.7.0'
    id 'io.spring.dependency-management' version '1.0.11.RELEASE'
    id 'java'
}

group = 'me.cherrue'
version = '0.0.1-SNAPSHOT'
sourceCompatibility = '11'

configurations {
    compileOnly {
        extendsFrom annotationProcessor
    }
}

repositories {
    mavenCentral()
}

dependencies {
    // BE
    implementation 'org.springframework.boot:spring-boot-starter-web'

    // Database

    // FE
		implementation 'org.webjars:jquery:3.6.0'
    implementation 'org.webjars:bootstrap:5.1.3'
    implementation 'org.webjars:webjars-locator-core'

    // Utils
    compileOnly 'org.projectlombok:lombok'
    annotationProcessor 'org.projectlombok:lombok'
    annotationProcessor 'org.springframework.boot:spring-boot-configuration-processor'

    // Test
    testImplementation 'org.springframework.boot:spring-boot-starter-test'
}

tasks.named('test') {
    useJUnitPlatform()
}
홈페이지 생성
- src/main/resources/static/index.html
<!doctype html>
<html lang="en">
<head>
    <meta charset="utf-8"/>
    <meta http-equiv="X-UA-Compatible" content="IE=edge"/>
    <title>Demo</title>
    <meta name="description" content=""/>
    <meta name="viewport" content="width=device-width"/>
    <base href="/"/>
    <link rel="stylesheet" type="text/css" href="/webjars/bootstrap/css/bootstrap.min.css"/>
    <script type="text/javascript" src="/webjars/jquery/jquery.min.js"></script>
    <script type="text/javascript" src="/webjars/bootstrap/js/bootstrap.min.js"></script>
</head>
<body>
	<h1>Demo</h1>
	<div class="container"></div>
</body>
</html>
여기까지 잘 되었는지 테스트 : 프로젝트 run 후 localhost:8080 접속 시 Demo 표출

2. OAuth2 로그인 설정 (github)
github OAuth App 생성
https://github.com/settings/developers
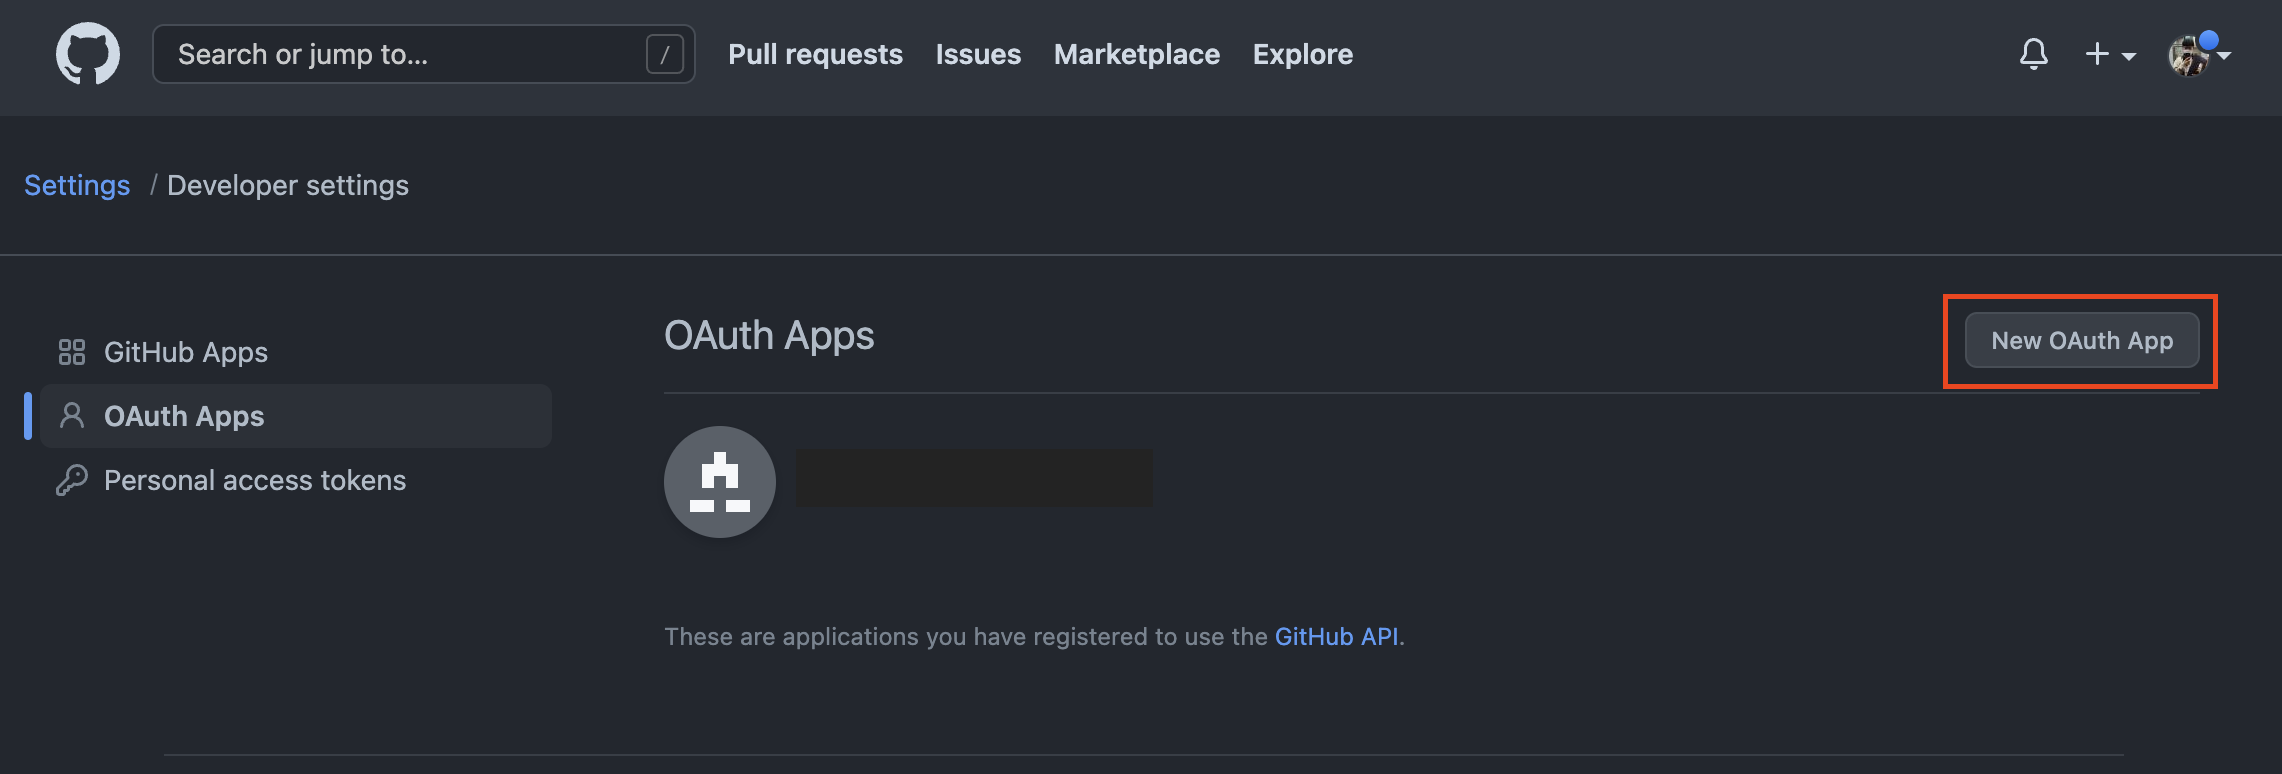
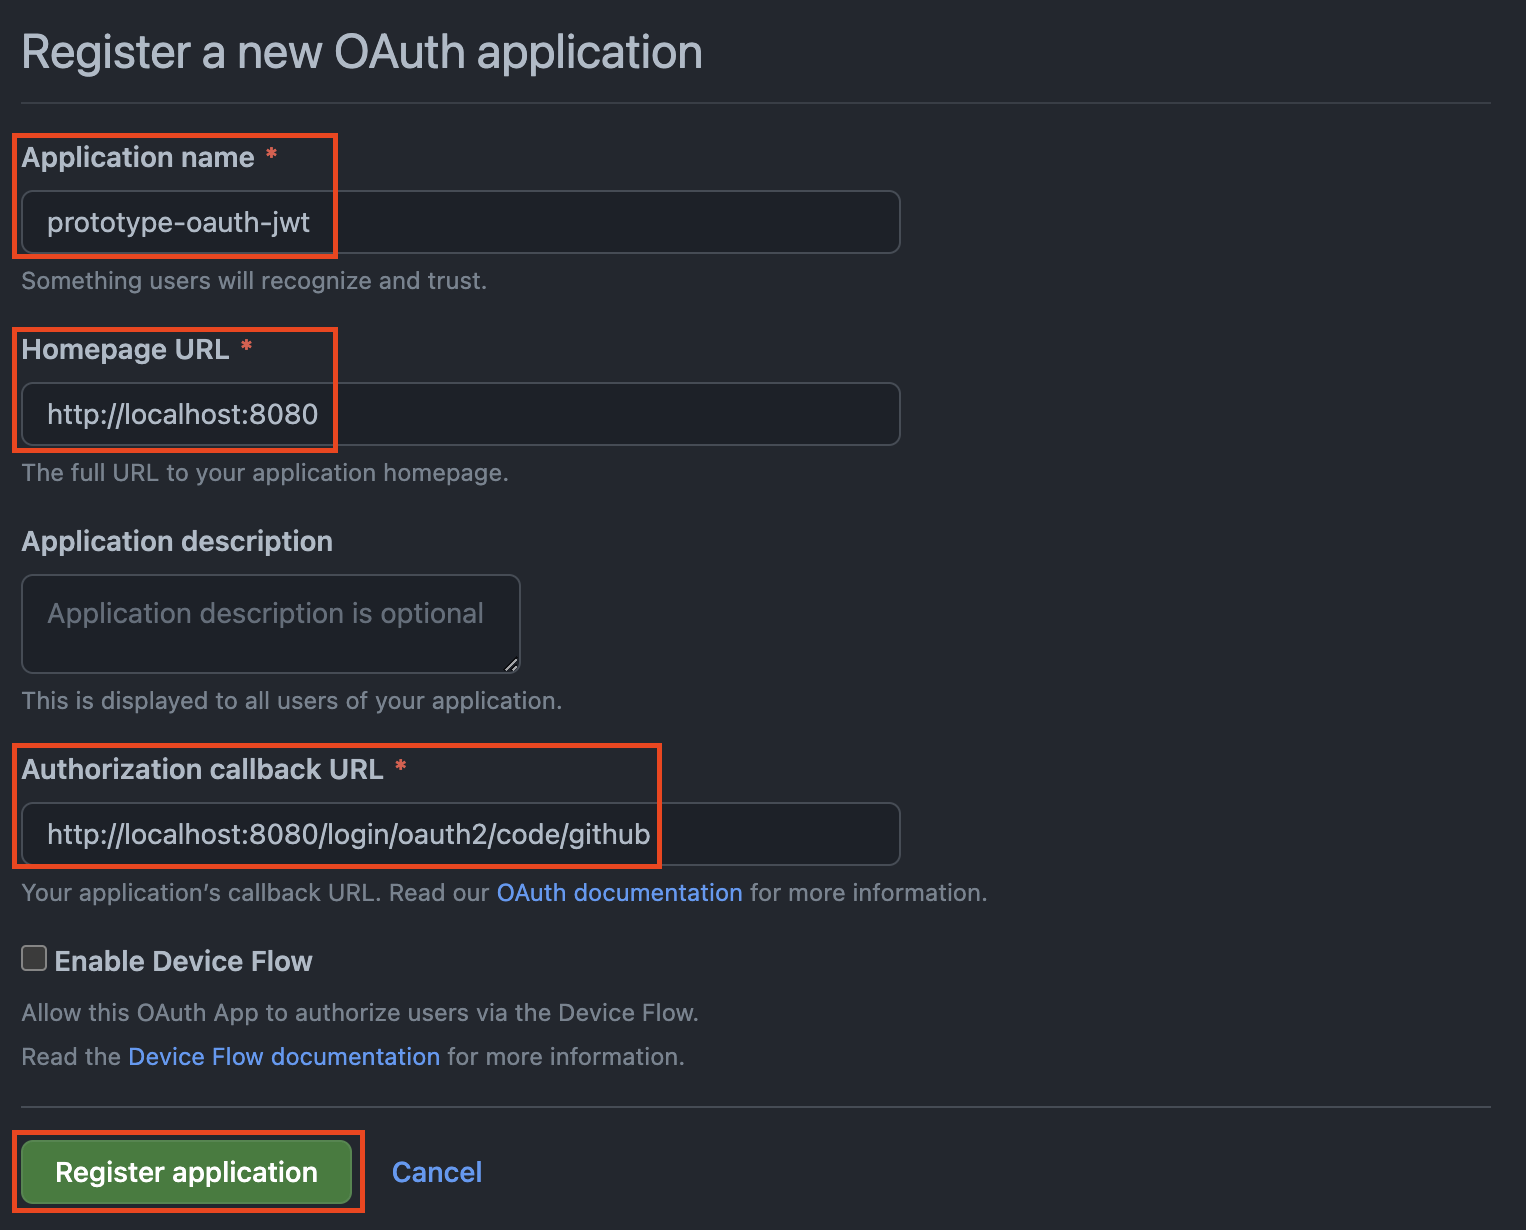
Homepage URL : http://localhost:8080
Authorization callback URL : http://localhost:8080/login/oauth2/code/github
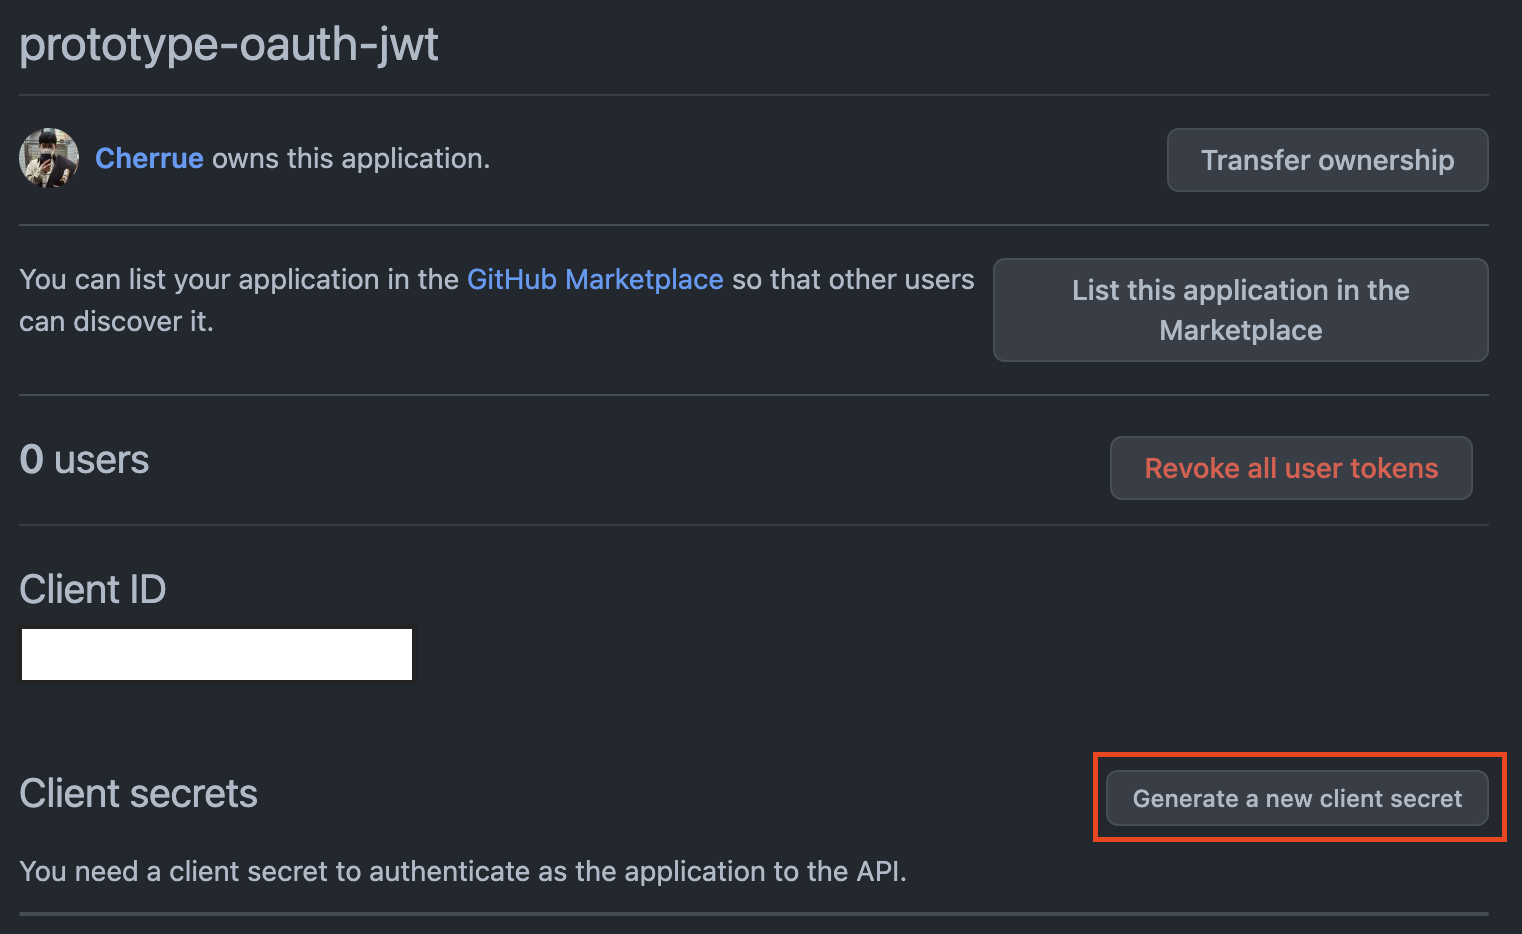
client secret 생성 시 github 비밀번호를 묻는다.
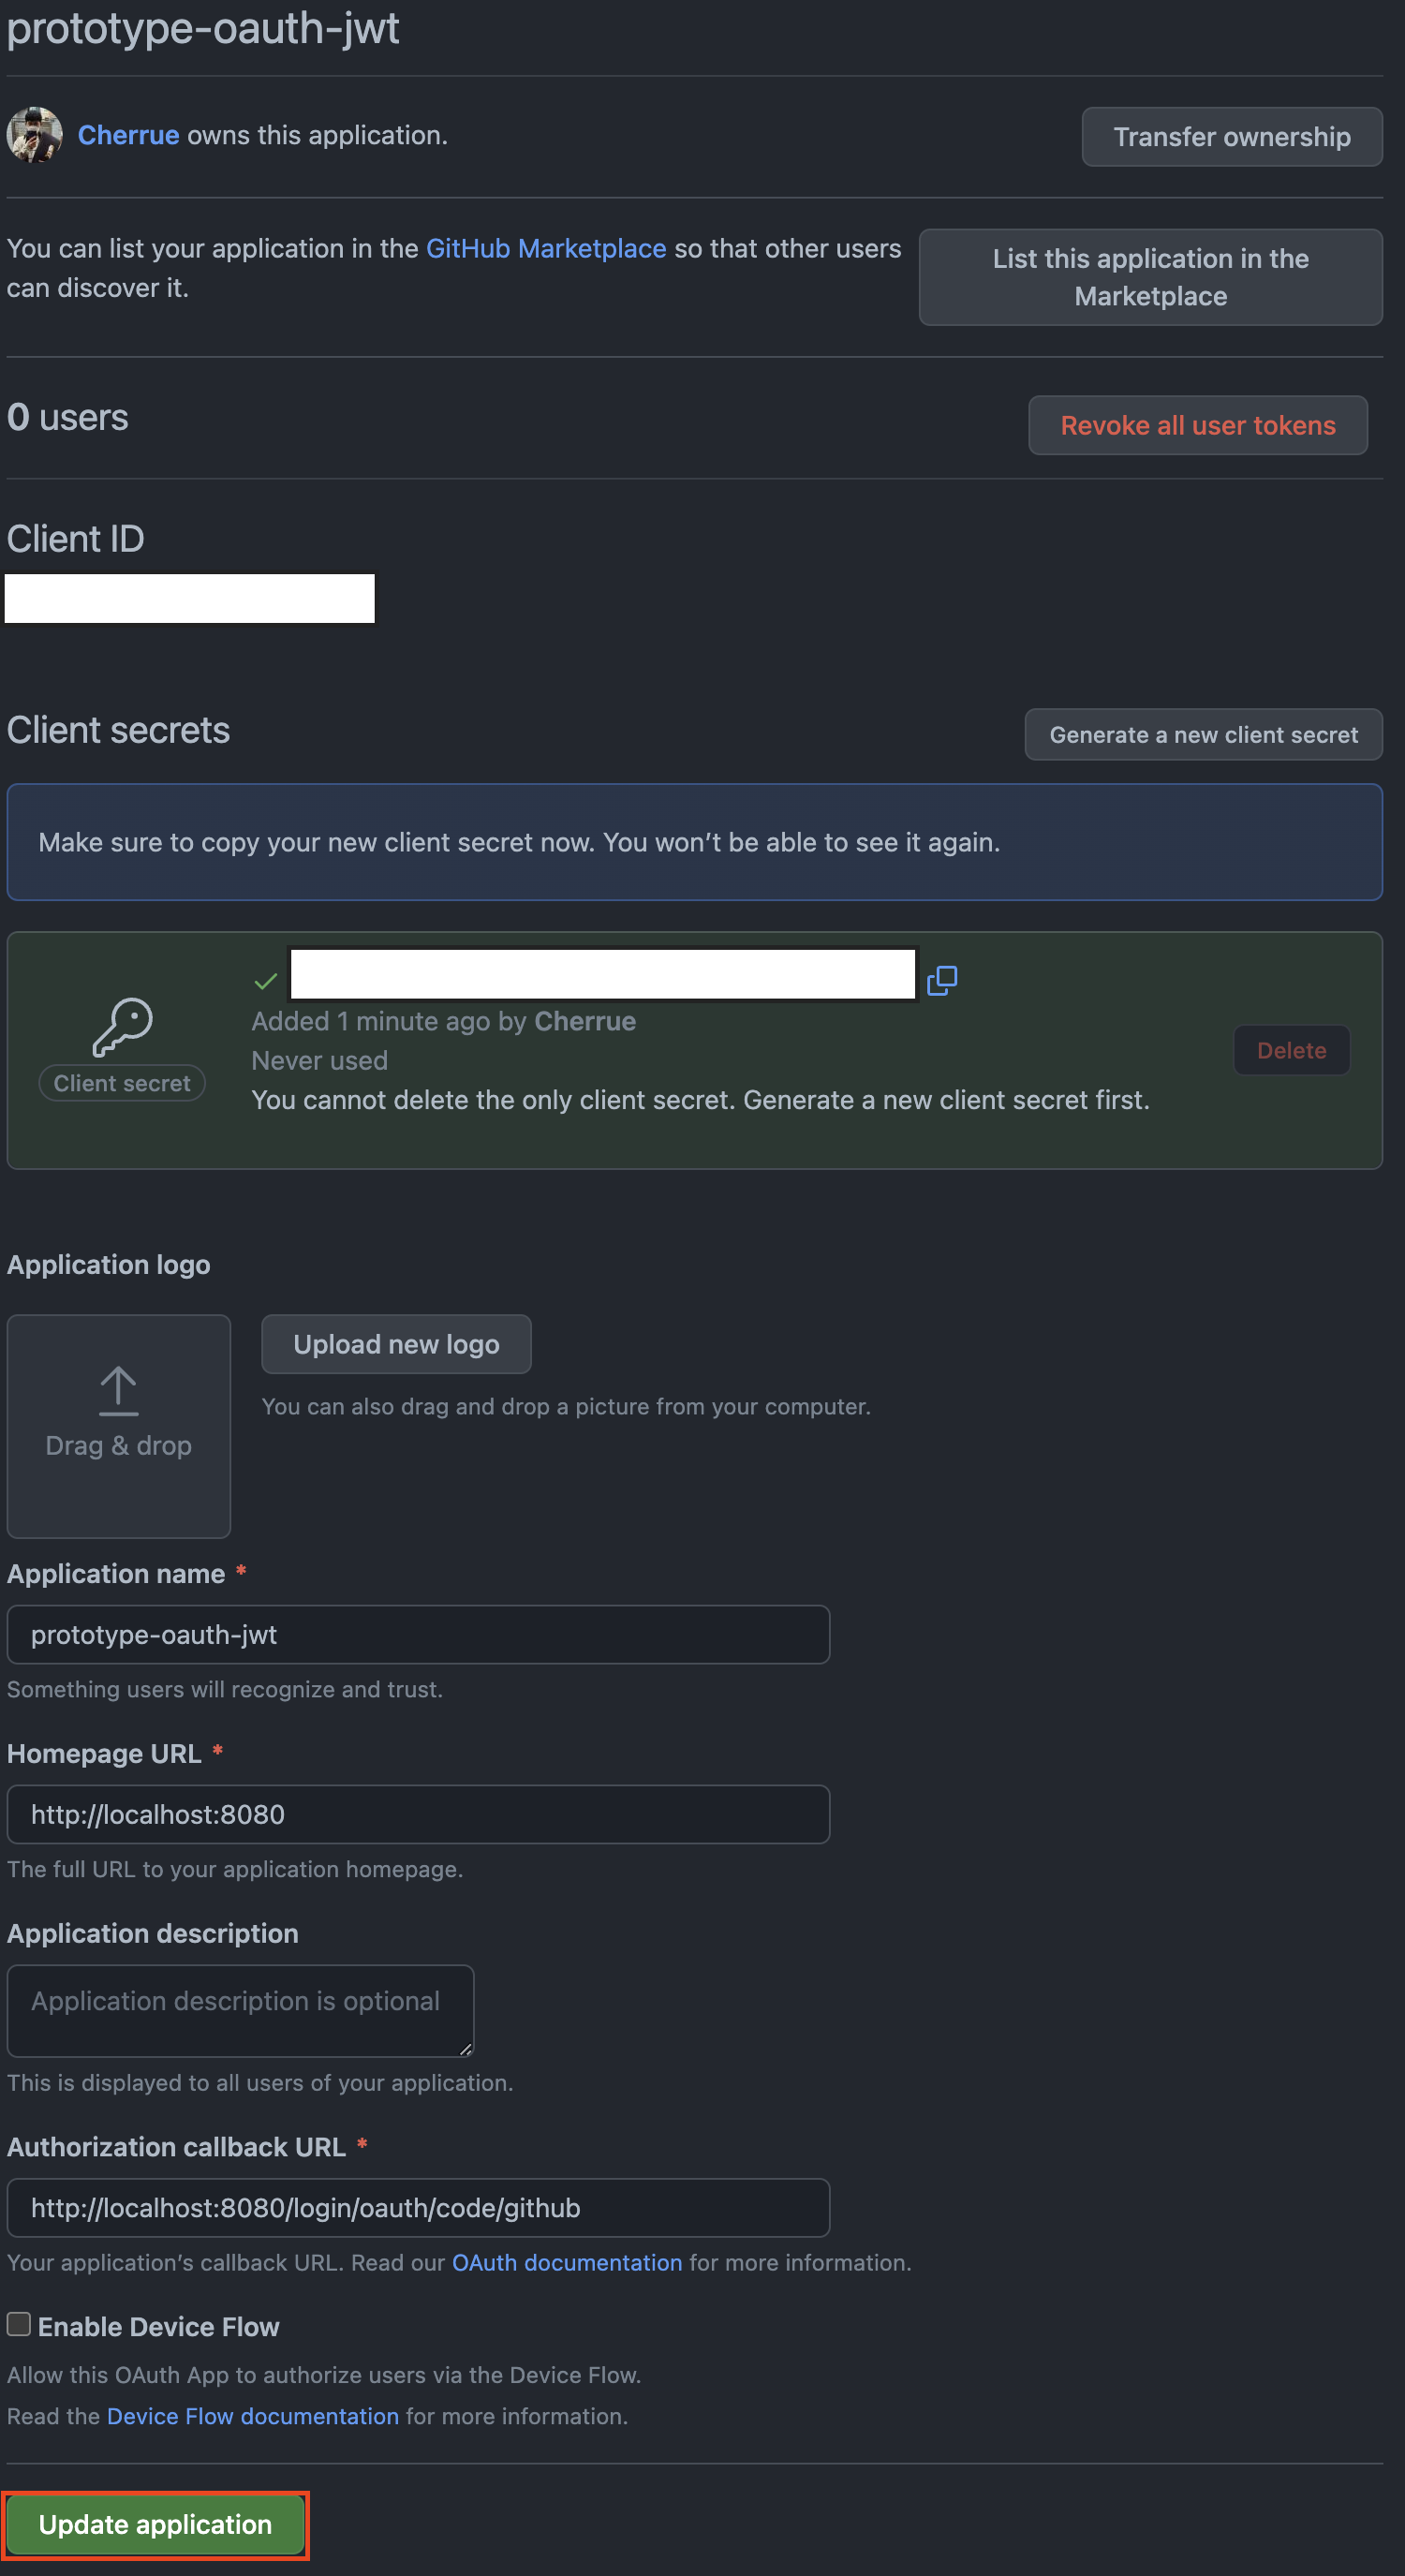
- Authorization callback URL 은 http://localhost:8080/login/oauth2/code/github 가 맞습니다.
Client Secret은 이 화면을 벗어나면 숨겨집니다. 미리 복사해둡시다.
만약 복사해두지 못했다면 새 secret을 만들어 복사후 기존의 secret을 삭제하면 됩니다.
프로젝트에 키 값 추가
먼저 의존성을 추가합니다. spring-boot-starter-oauth2-client
각종 oauth 관련 자동설정과 spring-security가 추가됩니다.
dependencies {
    // BE
		implementation 'org.springframework.boot:spring-boot-starter-oauth2-client'
		...
}
private 한 키값을 저장할 private.yml을 생성합니다
- /src/main/resources/private.yml
위에서 생성한 github application 의 client id와 secrets 를 복사하여 여기에 작성합니다.
private:
  key:
    oauth:
      github:
        clientId: { github oauth app Client ID }
        clientSecret: { github oauth app Client secrets}
private 값을 application.yml 에서 불러옵니다.
spring:
  config:
    import: classpath:/private.yml
  security:
    oauth2:
      client:
        registration:
          github:
            clientId: ${private.key.oauth.github.clientId}
            clientSecret: ${private.key.oauth.github.clientSecret}
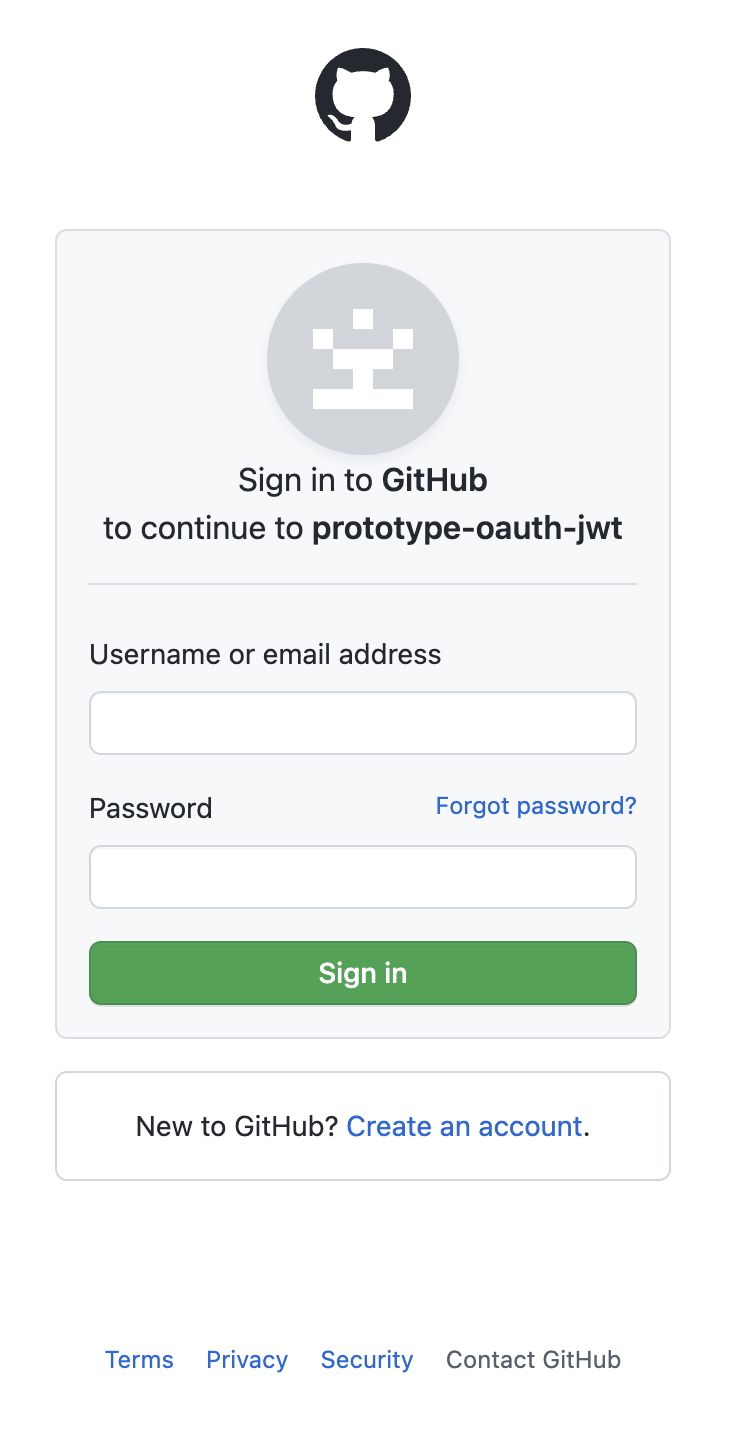
여기까지 잘 되었는지 테스트 : 프로젝트 run 후 localhost:8080 접속 시 github login 페이지 바로 표출
로그인 후 계정 연결에 동의하면 아래 화면이 보인다.

3. Welcome page 추가 및 Security 설정
2번까지 진행하면 root 페이지(”http://localhost:8080/”) 로 진입 시 바로 로그인 창으로 redirect 됩니다.
그렇지 않도록 Welcome page와 로그인 버튼, 그리고 이를 위한 보안 설정을 합니다.
Welcome page 작성
인증이 안 된 경우 로그인 버튼을, 로그인이 된 경우엔 사용자의 이름을 출력합니다.
- /src/main/resources/static/index.html
...
	<div class="container unauthenticated">
	    With GitHub: <a href="/oauth2/authorization/github">click here</a>
	</div>
	<div class="container authenticated" style="display:none">
	    Logged in as: <span id="user"></span>
	</div>
...
</body>
<script type="text/javascript">
    $.get("/user", function(data) {
        $("#user").html(data.name);
        $(".unauthenticated").hide()
        $(".authenticated").show()
    });
</script>
</html>
로그인이 되었을 때 출력할 이름을 가져올 /user endpoint를 작성합니다.
- Application.java
@RestController
@Slf4j
@SpringBootApplication
public class PrototypeOauthJwtApplication {

    @GetMapping("/user")
    public Map<String, Object> user(@AuthenticationPrincipal OAuth2User principal) {
        log.info(principal.toString());
        return Collections.singletonMap("name", principal.getAttribute("name"));
    }

    public static void main(String[] args) {
        SpringApplication.run(PrototypeOauthJwtApplication.class, args);
    }

}
인증되지 않은 사용자도 Welcome page에 접속할 수 있도록 보안 예외를 처리합니다.
-
SecurityConfiguration.java
-
WebSecurityConfigurerAdapter가 deprecated 되어 튜토리얼과 소스가 다릅니다.
-
WebSecurityConfigurerAdapter deprecated 변환 가이드 : https://spring.io/blog/2022/02/21/spring-security-without-the-websecurityconfigureradapter
@EnableWebSecurity 은 @Configuration을 포함하고, HttpSecurity 를 주입받을 수 있게 도와줍니다.
anyMatchers에 포함된 endpoint는 permit 해주고, 오류가 발생하면 401 인가받지 않은 사용자 오류를 뱉습니다.
기본적인 httpBasic을 추가해주고, oauth2Login을 활성화해줍니다.
@EnableWebSecurity
public class SecurityConfiguration {

    @Bean
    public SecurityFilterChain filterChain(HttpSecurity http) throws Exception {
        // @formatter:off
        http
                .authorizeRequests(a -> a
                        .antMatchers("/", "/error", "/webjars/**").permitAll()
                        .anyRequest().authenticated()
                )
                .exceptionHandling(e -> e
                        .authenticationEntryPoint(new HttpStatusEntryPoint(HttpStatus.UNAUTHORIZED))
                )
                .httpBasic(withDefaults())
                .oauth2Login();
        // @formatter:on
        return http.build();
    }
}
여기까지 잘 되었는지 테스트 : 프로젝트 run 후 localhost:8080 접속 시 With GitHub: click here 표출

4. logout 설정
JWT를 적용하면 logout은 사용할 수 없지만, 그 때까지 개발 편의상 붙여둡시다.
client 수정
서버측 controller 수정은 필요 없다. Spring Security에서 /logout endpoint를 지원한다.
- /src/main/resources/static/index.html
...
<div class="container authenticated">
  Logged in as: <span id="user"></span>
  <div>
    <button onClick="logout()" class="btn btn-primary">Logout</button>
  </div>
</div>
...
<script>
var logout = function() {
    $.post("/logout", function() {
        $("#user").html('');
        $(".unauthenticated").show();
        $(".authenticated").hide();
    })
    return true;
}
...
</script>
Security 수정
logout 설정을 붙인다.
추가적으로 사용자를 CSRF 공격에서 보호하기 위해 CSRF-Token을 발급한다.
- SecurityConfiguration.java
		@Bean
    public SecurityFilterChain filterChain(HttpSecurity http) throws Exception {
        // @formatter:off
        http
						...
                .logout(l -> l
                        .logoutSuccessUrl("/").permitAll()
                )
                .csrf(c -> c
                        .csrfTokenRepository(CookieCsrfTokenRepository.withHttpOnlyFalse())
                )
	          ...
        // @formatter:on
        return http.build();
    }
client에 CSRF-Token 추가
- /src/main/resources/static/index.html
$.ajaxSetup({
  beforeSend : function(xhr, settings) {
    if (settings.type == 'POST' || settings.type == 'PUT'
        || settings.type == 'DELETE') {
      if (!(/^http:.*/.test(settings.url) || /^https:.*/
        .test(settings.url))) {
        // Only send the token to relative URLs i.e. locally.
        xhr.setRequestHeader("X-XSRF-TOKEN",
          Cookies.get('XSRF-TOKEN'));
      }
    }
  }
});
여기까지 잘 되었는지 테스트 : localhost:8080 깃헙 로그인 → 로그아웃 버튼 클릭 → 로그인화면

이후 튜토리얼에서는 oauth client 추가(Google), error 페이지 추가를 다룹니다. 궁금하시다면 튜토리얼로.
다음 Step으로 SNS 로 회원가입을 지원하기 위해 DB를 연결하고 SNS 로그인 정보를 저장하겠습니다.

댓글남기기